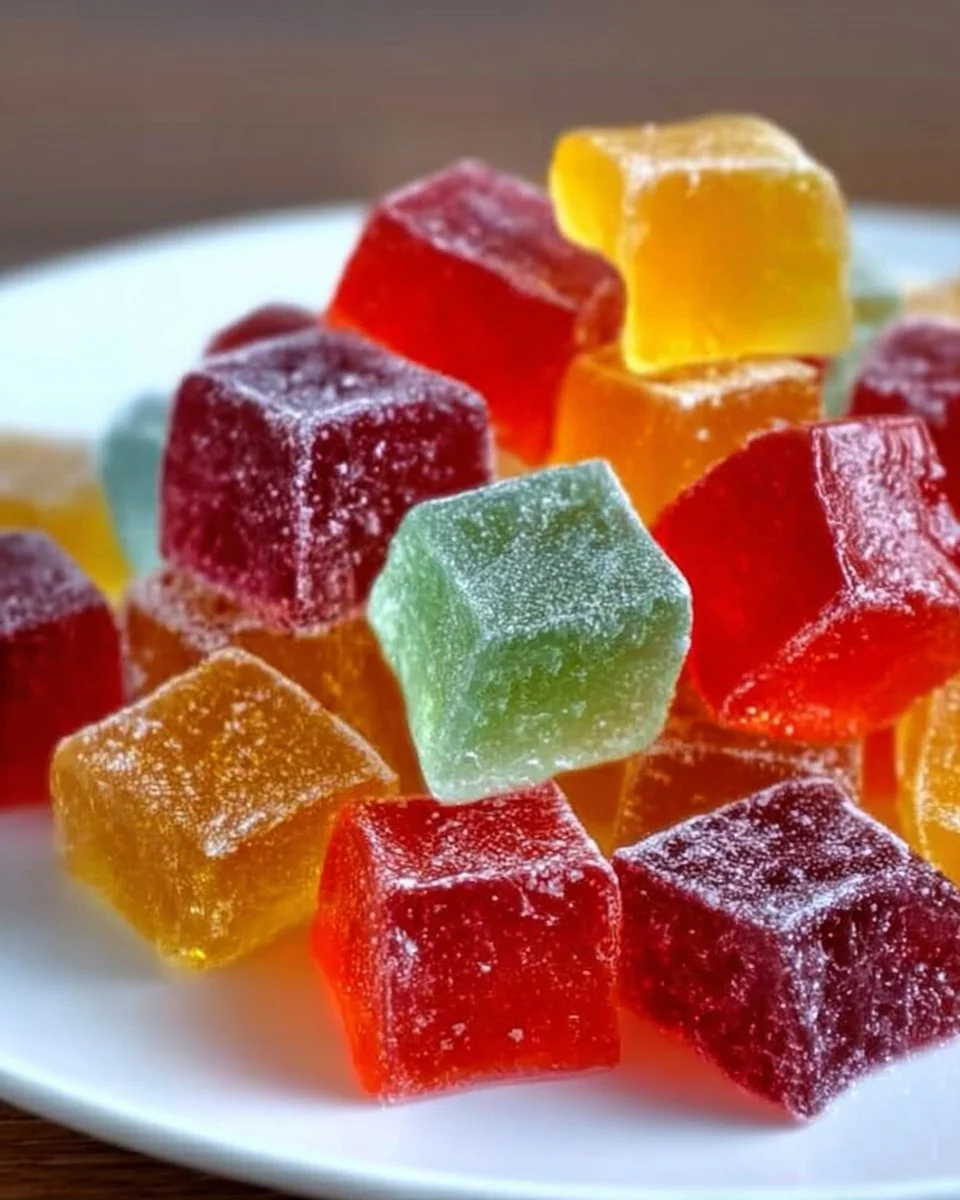
It’s a rainy afternoon, the kind that pulls you into a cozy embrace, cradling you in the warmth of home. The aroma of something sweet wafts through the air, coaxing you to relax. What might it be? Perhaps the tantalizing scent of homemade gummy candies, bright and cheery, transporting you back to childhood days filled with laughter and carefree moments. Imagine sinking your teeth into a soft, chewy piece, bursting with flavor, and capturing the essence of your favorite fruits. The experience doesn’t just satisfy your sweet tooth; it brings joy and nostalgia flooding back, delighting all your senses.
Homemade gummies redefine sweetness with their vibrant colors and playful shapes, a delightful canvas for your creativity. Whether you shape them like whimsical bears or festive holiday shapes, each piece guarantees fun in every bite. With fruity flavors dancing on your tongue, and a texture that is both firm yet yielding, these gummies enchant both kids and adults alike. You’ll find yourself venturing into the kitchen not just for a treat, but to craft memories, as you whip up a batch of these edible treasures.
Why You’ll Love This Gummies Recipe
Homemade gummies bring the magic of candy-making right into your home. There’s something uniquely satisfying about crafting your sweets, allowing you to customize flavors, colors, and even shapes. Unlike store-bought gummies loaded with artificial ingredients, this recipe utilizes simple, wholesome components that you can feel good about.
Imagine hosting a fun gathering while serving these delightful homemade gummies — they become instant conversation starters, perfect for birthdays, parties, or just a cozy night in. Their tantalizing flavors elevate every occasion, making even the simplest moments feel extra special. You might find that friends and family rave about these bright, flavorful candies long after the last piece is gone!
Preparation Phase & Tools to Use
Preparation is key when crafting your delectable treats, and having the right tools can make the process smoother and more enjoyable. Here’s what you’ll need:
- Silicone Molds: Essential for shaping your gummies, choose molds in fun designs to spark joy in your creations. Silicone molds ensure easy removal and keep your gummies intact.
- Saucepan: A medium-sized saucepan is ideal for gently heating your mixture. This allows you to melt the ingredients smoothly without scalding them.
- Whisk: A whisk helps incorporate air into your mixture, leading to a lovely, light texture. Plus, it makes combining the ingredients efficient and fun!
- Dropper or Spoon: These make it easy to pour the gummy mixture into molds accurately, preventing spills and messes.
Prepare your kitchen by clearing your workspace and gathering these essential tools before you start. This organization will help keep the fun and creativity flowing without interruption.
Ingredients for Gummies
Creating delicious homemade gummies involves a few key ingredients that come together beautifully:
- Fruit Juice: Choose 100% pure fruit juice like apple, orange, or any berry flavor you adore. The juice acts as the flavor base and delivers vibrant color.
- Gelatin: Unflavored gelatin adds the chewy texture characteristic of gummies. For vegetarian or vegan options, consider agar-agar or pectin as substitutes.
- Sweetener: Honey, sugar, or agave nectar sweetens your mixture; adjust it according to your taste preference. For a low-sugar version, use stevia or erythritol.
- Citric Acid (optional): A touch of citric acid adds a sour kick, enhancing the flavor profile and balancing out sweetness for a more complex taste.
With a few slight tweaks to the ingredients, you can create a batch that speaks to your palate and dietary needs.
How to Make Gummies
Crafting your gummies is as enjoyable as savoring them! Follow these easy steps to create your homemade masterpieces:
-
Prepare Your Molds: Start by placing your silicone molds on a baking sheet for stability. This makes transferring them to the fridge easier once filled.
-
Mix the Ingredients: In a saucepan over low heat, combine 1 cup of fruit juice with 2 tablespoons of sweetener. If you’re using gelatin, sprinkle it over the mixture. Let it bloom for about 5 minutes to activate.
-
Heat and Stir: Gently warm the mixture over low heat, whisking continuously until the sweetener and gelatin dissolve completely. Avoid boiling!
-
Flavor It Up: If desired, mix in 1 teaspoon of citric acid for a tart twist, stirring until well incorporated.
-
Pour into Molds: Using a dropper or spoon, carefully pour the mixture into your prepared molds. Fill them to the rim for optimal gummy thickness.
-
Chill and Set: Transfer the filled molds to the refrigerator. Allow them to set for at least 4 hours, or preferably overnight, until firm.
-
Remove and Enjoy: Once set, gently twist the silicone molds to release your gummies. Store in an airtight container for freshness.
Chef’s Notes & Helpful Tips
Making gummies is all about creativity and customization. Here are a few expert tips:
-
Make Ahead: Prepare a batch of gummies ahead of time for parties or gatherings. They keep well in the fridge for up to two weeks, or you can freeze them for longer storage.
-
Cooking Alternatives: If you prefer, you can heat the mixture in the microwave. Combine the ingredients in a microwave-safe bowl and heat in short bursts, stirring between intervals.
-
Customization Ideas: Feel playful! Infuse flavors with herbs like mint or basil, or experiment with layering different juice flavors for a rainbow effect.
Common Mistakes to Avoid
Even the best intentions can lead to gummy blunders! Here’s what to keep in mind to ensure success:
-
Overheating the Mixture: Always heat on low to avoid burning the gelatin, which would ruin the texture. Gentle heating preserves the quality.
-
Not Letting Them Set Long Enough: Patience is key! Rushing the setting time leads to a mushy texture rather than the delightful chewiness you desire.
-
Using the Wrong Gelatin: If opting for a vegetarian substitute, ensure you follow the package instructions for measuring and preparation; otherwise, you might end up with a soupy mixture!
What to Serve With Gummies
These delightful, fruity treats can shine alongside various snacks and beverages. Consider these pairing ideas:
-
Cheese Platter: Bright, sweet gummies contrast beautifully with a savory cheese selection, creating a balanced snack experience.
-
Fruit Skewers: Serve gummies alongside fresh fruit for a vibrant, healthy treat. The combination of textures and flavors excites the palate.
-
Yogurt Parfaits: Sprinkle gummies atop yogurt for a colorful breakfast or dessert, adding creaminess and crunch.
-
Cocktails: Use them as fun garnish for cocktails! They add a playful touch and infuse drinks with bursts of flavor.
-
Popcorn: For a sweet-and-salty combination, serve your gummies in a bowl alongside popcorn sprinkled with sea salt.
-
Ice Cream Sundaes: Incorporate them into ice cream or utilize them as a fruity topping on sundaes for added fun.
Storage & Reheating Instructions
To keep your gummies fresh, store them in an airtight container. They last for up to two weeks in the fridge. For longer storage, you can freeze them. Just make sure they are in a freezer-safe container to avoid freezer burn. When ready to enjoy, let them thaw at room temperature; there’s no need for reheating!
Estimated Nutrition Information
While the nutrition values can vary based on specific ingredients, here’s a rough estimate per piece (1 gummy):
- Calories: 20
- Total Fat: 0g
- Carbohydrates: 5g
- Sugars: 4g
- Protein: 1g
Please note that these figures are estimates and may change based on specific brands and ingredients used.
FAQs
1. Can I use fresh fruit instead of juice?
Using fresh fruit is fantastic! Simply blend the fruit and strain it to extract the juice. This allows for a fresh flavor profile, though keep in mind it might slightly alter the texture.
2. How can I make vegan gummies?
Substitute unflavored gelatin with agar-agar, a seaweed-based alternative. Follow the packaging instructions, as the setting process differs from traditional gelatin.
3. Are homemade gummies healthier than store-bought?
Absolutely! You control the ingredients, ensuring organic juices and natural sweeteners, avoiding unhealthy additives often found in commercial candies.
4. Can I make gummies without sugar?
Yes! Use natural sweeteners like stevia or erythritol for a sugar-free version that still packs a delightful taste without the calories.
5. What’s the best way to cut out shapes if I don’t have molds?
You can pour the mixture into a shallow dish, allowing it to set. Once firm, use cookie cutters to create fun shapes, making your gummies more playful!
Conclusion
Crafting your own homemade gummies is an adventure filled with creativity, flavor, and delightful nostalgia. Each bite delivers a burst of joy that resonates beyond mere taste, echoing laughter and celebration. As you discover the pleasure of making these candies, you’ll find that they become a cherished treat in your home. So gather your ingredients, unleash your imagination, and dive into the world of candy-making—your taste buds will thank you!
Print
Homemade Fruity Gummies
- Prep Time: 15 minutes
- Cook Time: 10 minutes
- Total Time: 240 minutes
- Yield: 15 servings 1x
- Category: Snacks
- Method: Refrigeration
- Cuisine: American
- Diet: Vegan
Description
Create delightful homemade gummy candies bursting with fruity flavors and nostalgic joy, perfect for kids and adults alike.
Ingredients
- 1 cup of 100% pure fruit juice (e.g., apple, orange, or berry)
- 2 tablespoons of sweetener (honey, sugar, or agave nectar)
- 2 tablespoons of unflavored gelatin (or vegetarian substitute like agar-agar)
- 1 teaspoon of citric acid (optional)
Instructions
- Prepare your molds: Start by placing your silicone molds on a baking sheet for stability.
- Mix the ingredients: In a saucepan over low heat, combine the fruit juice and sweetener, then sprinkle gelatin over the mixture to bloom for about 5 minutes.
- Heat and stir: Warm the mixture over low heat, whisking until the sweetener and gelatin dissolve completely.
- Flavor it up: If desired, mix in citric acid for a tart twist.
- Pour into molds: Carefully pour the mixture into prepared molds.
- Chill and set: Refrigerate the molds for at least 4 hours or overnight until firm.
- Remove and enjoy: Twist the molds to release your gummies and store them in an airtight container.
Notes
Customize flavors by infusing herbs or layering different juice flavors. Ensure not to overheat the mixture to avoid ruining the texture.
Nutrition
- Serving Size: 1 gummy
- Calories: 20
- Sugar: 4g
- Sodium: 0mg
- Fat: 0g
- Saturated Fat: 0g
- Unsaturated Fat: 0g
- Trans Fat: 0g
- Carbohydrates: 5g
- Fiber: 0g
- Protein: 1g
- Cholesterol: 0mg