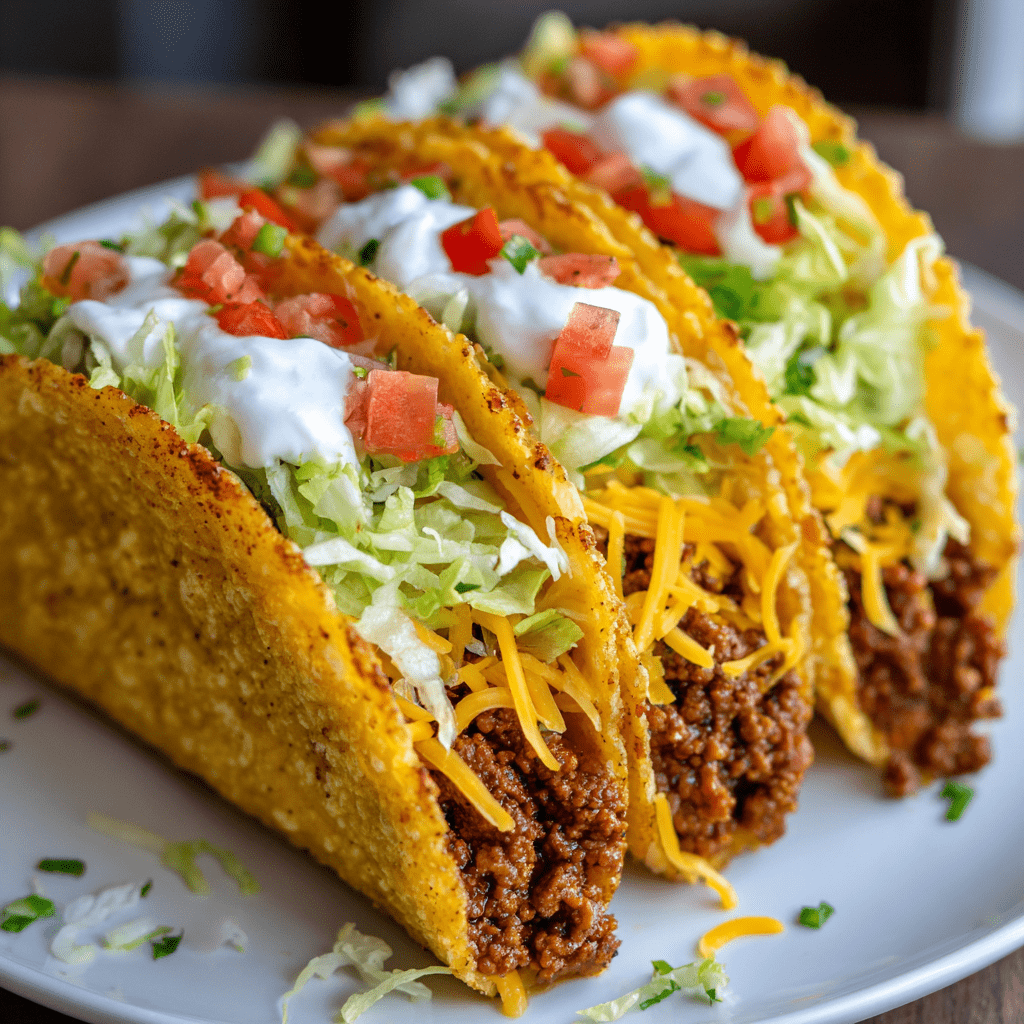
Introduction to Oven-Baked Cheesy Tacos (Crispy & Loaded)
As a busy mom, I know how challenging it can be to whip up a meal that pleases everyone. That’s where my Oven-Baked Cheesy Tacos (Crispy & Loaded) come in! These delightful tacos are not just easy to make; they’re a crowd-pleaser that brings smiles to the dinner table. Imagine crispy taco shells filled with seasoned beef and melted cheese, all baked to perfection. Whether it’s a hectic weeknight or a fun family gathering, this recipe is your go-to solution for a delicious meal that’s sure to impress your loved ones.
Why You’ll Love This Oven-Baked Cheesy Tacos (Crispy & Loaded)
These Oven-Baked Cheesy Tacos are a lifesaver for busy nights! They come together in just 30 minutes, making them perfect for those evenings when time is tight. The combination of crispy shells and gooey cheese creates a flavor explosion that your family will adore. Plus, they’re customizable, so everyone can add their favorite toppings. Trust me, once you try these, they’ll become a staple in your home!
Ingredients for Oven-Baked Cheesy Tacos (Crispy & Loaded)
Gathering the right ingredients is key to making these Oven-Baked Cheesy Tacos a hit! Here’s what you’ll need:
- Taco shells: The crispy base for your tacos. You can use traditional corn or flour shells, depending on your preference.
- Ground beef: This is the star protein that brings heartiness to your tacos. You can also substitute it with ground turkey or chicken for a lighter option.
- Taco seasoning: A blend of spices that adds that classic taco flavor. You can use store-bought or make your own with chili powder, cumin, and garlic powder.
- Shredded cheddar cheese: This melty goodness is what makes these tacos cheesy and delicious. Feel free to mix in Monterey Jack or pepper jack for a kick!
- Shredded lettuce: Adds a fresh crunch and balances the richness of the cheese and beef.
- Diced tomatoes: Juicy and vibrant, they bring a burst of flavor and color to your tacos.
- Sour cream: A creamy topping that adds a cool contrast to the spicy flavors. Greek yogurt is a great substitute if you want a healthier option.
- Sliced jalapeños (optional): For those who like a little heat, these spicy slices can elevate your taco experience.
For exact measurements, check the bottom of the article where you can find everything available for printing. Enjoy customizing your tacos with these ingredients!
How to Make Oven-Baked Cheesy Tacos (Crispy & Loaded)
Step 1: Preheat the Oven
Preheating your oven to 400°F (200°C) is crucial for achieving that perfect crispy texture. It ensures that the taco shells get nice and crunchy while the cheese melts beautifully. Trust me, this step is key to making your Oven-Baked Cheesy Tacos truly irresistible!
Step 2: Cook the Ground Beef
In a skillet over medium heat, add your ground beef. Break it apart with a spatula as it cooks. Browning the meat well adds depth to the flavor. Keep an eye on it, stirring occasionally, until it’s fully cooked and no longer pink. This step sets the foundation for your delicious tacos!
Step 3: Season the Beef
Once your beef is browned, it’s time to add the taco seasoning. This magical blend of spices transforms plain meat into a fiesta of flavor! Follow the packet instructions, adding water as needed. Let it simmer for a few minutes to let those flavors meld together beautifully.
Step 4: Arrange Taco Shells
Grab a baking dish and arrange your taco shells upright. This helps them cook evenly and keeps them from tipping over. Make sure they’re snug but not overcrowded. A well-organized taco shell lineup is the secret to a successful taco night!
Step 5: Fill the Taco Shells
Now comes the fun part! Carefully spoon the seasoned beef mixture into each taco shell. Be generous, but don’t overstuff them. You want to leave some room for cheese and toppings. A well-filled taco is a happy taco!
Step 6: Add Cheese
Sprinkle shredded cheddar cheese generously over each filled taco. Cheese is the star of the show here, adding creaminess and flavor. As it melts, it binds everything together, creating that gooey goodness we all crave in our Oven-Baked Cheesy Tacos!
Step 7: Bake the Tacos
Pop the baking dish into your preheated oven and bake for 10-12 minutes. Keep an eye on them! You’ll know they’re done when the cheese is melted and bubbly, and the taco shells are golden brown. This is the moment you’ve been waiting for!
Step 8: Add Toppings
Once out of the oven, it’s time to layer on your toppings. Start with shredded lettuce, then add diced tomatoes, a dollop of sour cream, and jalapeños if you like it spicy. Layering not only looks great but also enhances the flavor in every bite!
Tips for Success
- Use a non-stick baking dish to prevent sticking and make cleanup easier.
- Don’t skip preheating the oven; it’s essential for crispy taco shells.
- Experiment with different cheeses for unique flavors—try pepper jack for a spicy twist!
- Make extra filling and use it for nachos or burritos later in the week.
- Let the tacos cool for a few minutes before serving to avoid burns!
Equipment Needed
- Baking dish: A 9×13 inch dish works perfectly. You can also use a cast-iron skillet for a rustic touch.
- Skillet: A non-stick skillet is ideal for cooking the ground beef. Any frying pan will do!
- Spatula: Use this to break apart the meat while cooking. A wooden spoon works just as well.
- Measuring cups: Handy for measuring cheese and toppings, but you can eyeball it too!
Variations
- Vegetarian Option: Swap out the ground beef for black beans, lentils, or a mix of sautéed vegetables for a hearty, meatless meal.
- Spicy Kick: Add diced green chilies or a sprinkle of cayenne pepper to the beef mixture for an extra layer of heat.
- Cheese Lovers: Mix different types of cheese, like Monterey Jack or queso blanco, for a melty, flavorful twist.
- Gluten-Free: Use corn taco shells to keep this dish gluten-free while still enjoying all the delicious flavors.
- Breakfast Tacos: Substitute the beef with scrambled eggs and add toppings like avocado and salsa for a delightful breakfast version.
Serving Suggestions
- Side Salad: Pair your tacos with a fresh garden salad for a light and refreshing contrast.
- Rice or Beans: Serve with Mexican rice or refried beans for a hearty meal.
- Drinks: Enjoy with a chilled margarita or a refreshing iced tea to complement the flavors.
- Presentation: Serve on a colorful platter, garnished with fresh cilantro for a vibrant touch.
FAQs about Oven-Baked Cheesy Tacos (Crispy & Loaded)
Can I make Oven-Baked Cheesy Tacos ahead of time?
Absolutely! You can prepare the taco filling and fill the shells ahead of time. Just cover them and store in the fridge. When you’re ready to eat, pop them in the oven to bake. This makes for a quick dinner solution!
What can I use instead of ground beef?
If you’re looking for alternatives, ground turkey or chicken works well. For a vegetarian option, try black beans or lentils. Both options will still give you that hearty, satisfying flavor!
How do I store leftovers?
Store any leftover Oven-Baked Cheesy Tacos in an airtight container in the fridge. They’ll last for about 3 days. Reheat them in the oven for a few minutes to restore that crispy texture!
Can I freeze these tacos?
Yes, you can freeze the filled taco shells before baking. Just wrap them tightly in plastic wrap and foil. When you’re ready to enjoy, bake them straight from the freezer, adding a few extra minutes to the cooking time.
What toppings do you recommend for these tacos?
Get creative with toppings! I love adding fresh avocado, salsa, or even guacamole. You can also try diced onions, cilantro, or a sprinkle of lime juice for an extra zing. The possibilities are endless!
Final Thoughts
Making Oven-Baked Cheesy Tacos (Crispy & Loaded) is more than just cooking; it’s about creating joyful moments with family and friends. The aroma of seasoned beef and melted cheese wafting through the kitchen brings everyone together, sparking laughter and conversation. I love how this recipe is not only quick and easy but also allows for endless customization. Whether it’s a busy weeknight or a fun gathering, these tacos are sure to be a hit. So, roll up your sleeves, gather your loved ones, and enjoy the deliciousness that these tacos bring to your table!
Print
Oven-Baked Cheesy Tacos (Crispy & Loaded) are a must-try!
- Prep Time: 15 minutes
- Cook Time: 15 minutes
- Total Time: 30 minutes
- Yield: 12 tacos 1x
- Category: Main Dish
- Method: Baking
- Cuisine: Mexican
- Diet: Gluten Free
Description
Oven-Baked Cheesy Tacos are a delicious and easy-to-make dish that combines crispy taco shells with a cheesy filling, perfect for a family meal or a party.
Ingredients
- 12 taco shells
- 1 lb ground beef
- 1 packet taco seasoning
- 1 cup shredded cheddar cheese
- 1 cup shredded lettuce
- 1 cup diced tomatoes
- 1/2 cup sour cream
- 1/4 cup sliced jalapeños (optional)
Instructions
- Preheat the oven to 400°F (200°C).
- In a skillet, cook the ground beef over medium heat until browned.
- Add the taco seasoning and water as per the packet instructions, and simmer for a few minutes.
- Arrange the taco shells in a baking dish.
- Fill each taco shell with the seasoned beef mixture.
- Top each taco with shredded cheddar cheese.
- Bake in the preheated oven for 10-12 minutes, or until the cheese is melted and bubbly.
- Remove from the oven and top with lettuce, tomatoes, sour cream, and jalapeños if desired.
Notes
- For a vegetarian option, substitute ground beef with black beans or lentils.
- Feel free to customize toppings based on your preference.
- These tacos can be made ahead of time and reheated in the oven.
Nutrition
- Serving Size: 1 taco
- Calories: 250
- Sugar: 2g
- Sodium: 500mg
- Fat: 15g
- Saturated Fat: 7g
- Unsaturated Fat: 5g
- Trans Fat: 0g
- Carbohydrates: 20g
- Fiber: 2g
- Protein: 12g
- Cholesterol: 40mg