The rich, velvety allure of red velvet cake entwines itself with the luscious creaminess of cheesecake, creating a dessert that dances on the taste buds and stirs the soul. Imagine the first bite: a silky, creamy texture melts in your mouth, while the gentle tang of cream cheese perfectly balances the subtle sweetness of the red velvet base. Each forkful brings crunchy bursts of Oreo cookie, adding texture and flavor that transport you to dessert heaven. The intoxicating aroma fills the air, a tantalizing prelude to the decadent indulgence that awaits.
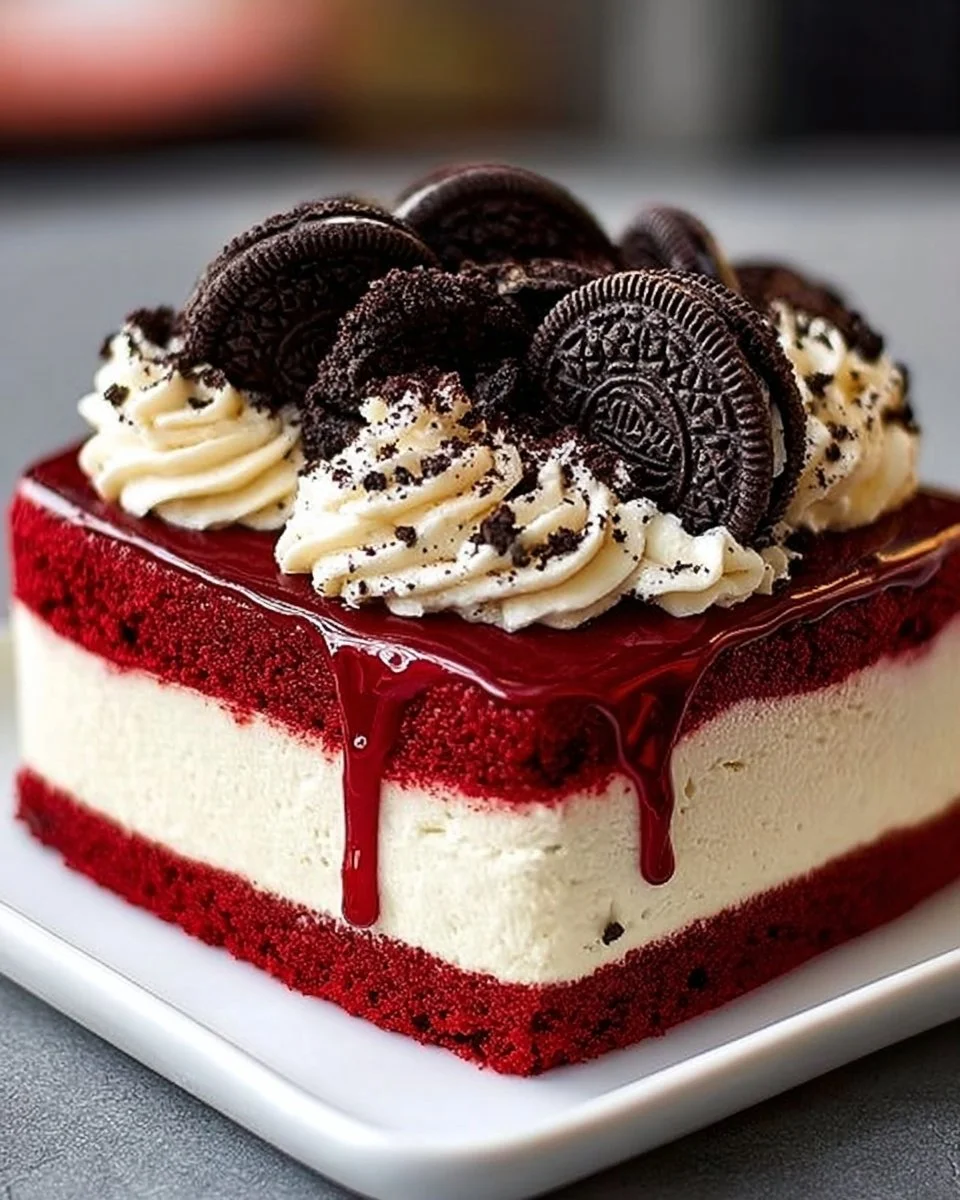
Picture this: a celebration, whether it’s a birthday, an anniversary, or simply a weekend treat. You unveil your masterpiece—a stunning Red Velvet Oreo Cheesecake, its deep crimson color drawing everyone in. The contrast of the creamy white topping layered with the dark Oreo crumbs creates an eye-catching centerpiece. As you slice through the layers, the smooth cream cheese filling and the soft, buttery crust invite eager forks to dig in. Each slice encapsulates the essence of joy, love, and celebration, leaving your guests clamoring for seconds.
Why You’ll Love This Red Velvet Oreo Cheesecake
This Red Velvet Oreo Cheesecake is the ultimate indulgence—where classic flavors meet modern creativity. The blend of velvety red velvet cake and rich cheesecake creates a dessert so beautifully unique, every bite tells a story. You’ll love that this cheesecake is perfect for any occasion, whether it’s a festive gathering, an intimate family dinner, or even a cozy movie night at home. It has this certain charm that makes it stand out among traditional desserts. The contrasting textures captivate your palate, offering the perfect mixture of richness and refreshing sweetness. Plus, it’s a showstopper that guarantees delight and surprise, making it a favorite among friends and family!
Preparation Phase & Tools to Use
Before you dive into the delightful world of cheesecake perfection, gather your tools. Each one plays a crucial role in delivering that stunning result.
- 9-inch springform pan: This pan allows for easy release, making sure your cheesecake looks flawless when it’s time to serve.
- Mixing bowls: You’ll need a few bowls—one for the crust ingredients, one for the cheesecake filling, and maybe one for your toppings. These combine flavors beautifully.
- Hand mixer or stand mixer: Whipping the cream cheese and heavy cream to that perfect consistency is essential, and an electric mixer saves time and effort.
- Spatula: Essential for folding in those crushed Oreos and ensuring a smooth filling.
- Oven: The heart of baking! Preheating it ensures even cooking, vital for achieving the right texture.
Preparation Tip: Take your cream cheese out of the fridge ahead of time for quicker softening. Cold cream cheese can lead to lumps in your cheesecake filling.
Ingredients for Red Velvet Oreo Cheesecake
- 1 1/2 cups red velvet cake mix: This gives your cheesecake that signature red hue and scrumptious flavor.
- 1/2 cup butter, melted: Adds richness and helps create a sturdy crust.
- 1/4 cup sugar: Sweetens the crust and rounds out the flavors.
- 1 package (8 oz) cream cheese, softened: The creamy base that makes the cheesecake irresistibly luscious.
- 1/2 cup powdered sugar: Offers a smooth, sweet finish to the cream cheese mixture.
- 1 cup heavy cream: This thickens the filling, creating that much-loved, rich texture.
- 1/2 cup crushed Oreo cookies: Tiny bits of crunchy bliss folded into the creamy filling.
- 1/2 teaspoon vanilla extract: Enhances the overall flavor, bringing subtle warmth.
- Extra Oreo cookies for topping: Because more chocolatey goodness is always a good idea.
Feel free to substitute the red velvet cake mix with a homemade recipe or even another flavored cake mix if desired. The essence of the cheesecake will stand strong, no matter the flavor!
How to Make Red Velvet Oreo Cheesecake
-
Preheat the oven to 350°F (175°C) and grease your springform pan. This ensures a non-stick experience.
-
In a bowl, combine the red velvet cake mix, melted butter, and sugar. Mix well until it forms a damp consistency. Press this mixture firmly into the bottom of the prepared pan to create an even crust.
-
In another bowl, beat the cream cheese and powdered sugar until smooth. This step is essential; don’t rush it! The mixture should be velvety with no lumps. Gradually add the heavy cream and vanilla extract, continuing to beat until it thickens and creates soft peaks. You can often feel the silky texture beginning to form.
-
Gently fold in the crushed Oreo cookies into the cream cheese mixture, using your spatula to maintain that lovely lightness in the cream.
-
Pour the creamy cheesecake filling over the crust in the pan. Use a spatula to smooth the top, achieving a beautiful finish.
-
Bake for 45-50 minutes or until the center is just set. The edges may puff slightly. Don’t worry; it’ll settle as it cools.
-
Allow it to cool in the pan for about an hour, then transfer it to the fridge to chill for at least 4 hours, or overnight for the best texture. Patience pays off!
-
Top with extra Oreo cookies before serving. You can crush them or leave them whole for a striking presentation that beckons irresistibly.
Chef’s Notes & Helpful Tips
- Make-ahead tip: This cheesecake stores beautifully in the fridge for a few days, making it a perfect dessert to prepare ahead of time for gatherings.
- Cooking alternatives: If you prefer, you can also use a double boiler method to bake your cheesecake—this helps prevent cracking by providing a gentler heat.
- Customization ideas: Try adding extra toppings like whipped cream, chocolate drizzle, or even fresh berries for a colorful twist.
Common Mistakes to Avoid
- Overmixing: This can incorporate too much air into the batter, leading to cracks in your cheesecake. Beat until smooth, then stop!
- Skipping the chill: Chilling time is non-negotiable. It transforms the texture into that creamy dream you’re looking for.
- Not using a water bath: Although optional, this method can help create a much smoother cheesecake.
- Opening the oven door: Resist the temptation! Sudden temperature changes can cause the cheesecake to sink.
What to Serve With Red Velvet Oreo Cheesecake
Pair your cheesecake with these delightful accompaniments for an elevated experience:
- Fresh berries: The tartness of strawberries, raspberries, or blueberries cut through the richness beautifully.
- Whipped cream: A dollop of fresh whipped cream adds a light, airy contrast that enhances every bite.
- Chocolate sauce: Drizzle for an extra layer of indulgence.
- Coffee or espresso: The warm flavors of coffee perfectly complement the sweetness of cheesecake.
- Milkshakes: Try pairing with an Oreo or vanilla milkshake for a deliciously nostalgic feel.
- Mint leaves: A sprig of mint adds a refreshing touch, balancing the dessert’s richness.
- Ice cream: Vanilla or cookies and cream ice cream takes your decadent dessert to another level.
Storage & Reheating Instructions
Keep your masterpiece fresh by storing it in the refrigerator, covered, for up to 5 days. If you want to freeze it, wrap individual slices tightly in plastic wrap and aluminum foil, allowing for up to 2 months of enjoyment later. To enjoy previously frozen cheesecake, thaw it overnight in the fridge for the best texture.
Estimated Nutrition Information
Approximate per slice (1/12 of a cheesecake): Calories: 350, Fat: 25g, Carbohydrates: 32g, Protein: 5g. Keep in mind these values may vary based on specific ingredients used.
FAQs
Can I make this cheesecake without a springform pan?
You can, but you might have trouble removing it from a regular pan. A springform pan makes it much easier to serve neatly.
Can I substitute cream cheese with something lighter?
Yes, you can look for low-fat cream cheese options, though they might not provide the same richness.
How long does this cheesecake last?
Stored properly in the fridge, it can last about 5 days, but trust me when I say it won’t last that long with the right crowd!
Can I use homemade red velvet cake instead?
Absolutely! If you have a favorite red velvet cake recipe, feel free to use it—just ensure it’s baked and cooled before turning it into a crust.
What if my cheesecake cracks?
Don’t fret! Cracks are common. You can always top it with whipped cream or a fruity sauce to hide the imperfections.
Embracing the joy of baking with a Red Velvet Oreo Cheesecake guarantees not just satisfaction but a true experience. Each layer unfolds a perfect blend of flavors and textures that keep you coming back for more. Get ready to savor every delicious bite and share heartwarming moments with those you cherish. Trust me—once you make it, you’ll never want to go back!
Print
Red Velvet Oreo Cheesecake
- Prep Time: 15 minutes
- Cook Time: 50 minutes
- Total Time: 265 minutes
- Yield: 12 servings 1x
- Category: Dessert
- Method: Baking
- Cuisine: American
- Diet: Vegetarian
Description
A rich and creamy red velvet cheesecake blended with crunchy Oreo cookies, perfect for any celebration.
Ingredients
- 1 1/2 cups red velvet cake mix
- 1/2 cup butter, melted
- 1/4 cup sugar
- 1 package (8 oz) cream cheese, softened
- 1/2 cup powdered sugar
- 1 cup heavy cream
- 1/2 cup crushed Oreo cookies
- 1/2 teaspoon vanilla extract
- Extra Oreo cookies for topping
Instructions
- Preheat the oven to 350°F (175°C) and grease your springform pan.
- Combine the red velvet cake mix, melted butter, and sugar in a bowl until it forms a damp consistency.
- Press this mixture firmly into the bottom of the prepared pan for an even crust.
- Beat the cream cheese and powdered sugar in another bowl until smooth.
- Gradually add the heavy cream and vanilla extract, beating until it thickens and forms soft peaks.
- Fold in the crushed Oreo cookies gently using a spatula.
- Pour the cheesecake filling over the crust in the pan, smoothing the top with a spatula.
- Bake for 45-50 minutes until the center is just set.
- Allow cooling in the pan for an hour before transferring to the fridge to chill for at least 4 hours, or overnight.
- Top with extra Oreo cookies before serving.
Notes
Make-ahead tip: This cheesecake stores beautifully in the fridge for a few days. Chilling time is essential for texture.
Nutrition
- Serving Size: 1 slice
- Calories: 350
- Sugar: 20g
- Sodium: 400mg
- Fat: 25g
- Saturated Fat: 15g
- Unsaturated Fat: 10g
- Trans Fat: 0g
- Carbohydrates: 32g
- Fiber: 2g
- Protein: 5g
- Cholesterol: 80mg