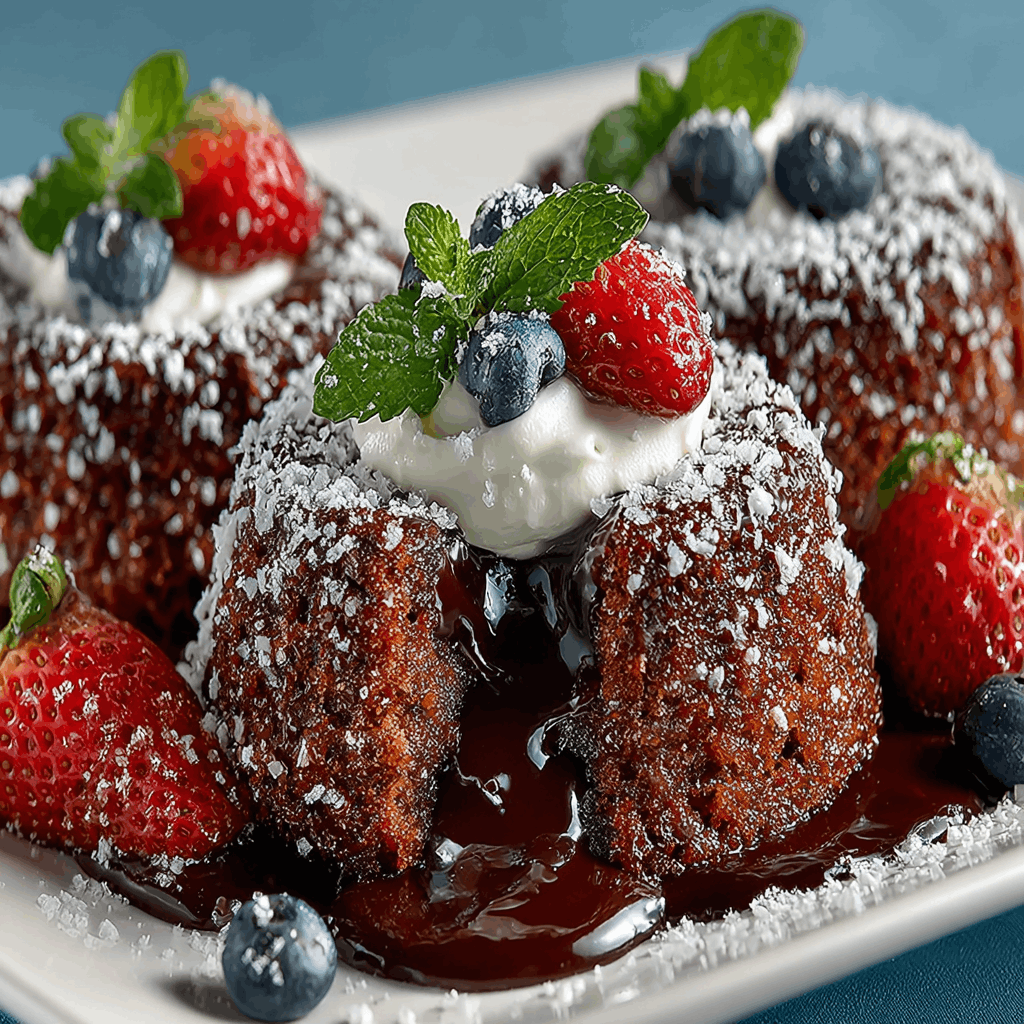
Introduction to Chocolate Lava Cakes
Ah, Chocolate Lava Cakes! Just the thought of them makes my heart skip a beat. These little wonders are the perfect solution for a busy day when you crave something sweet yet impressive. Imagine cutting into a warm cake, and that gooey chocolate center flows out like a delicious river. It’s a dessert that can turn an ordinary evening into a special occasion. Whether you’re celebrating a birthday or just treating yourself after a long week, this recipe is sure to delight your loved ones and satisfy your sweet tooth. Let’s dive into this chocolatey adventure!
Why You’ll Love This Chocolate Lava Cakes
These Chocolate Lava Cakes are a dream come true for busy moms and professionals alike. They’re quick to whip up, taking just 15 minutes of prep time. Plus, the taste is simply divine! The rich, molten chocolate center is a guaranteed crowd-pleaser, making them perfect for family dinners or last-minute gatherings. You’ll love how effortlessly they impress, leaving everyone asking for seconds. Trust me, these cakes are pure magic!
Ingredients for Chocolate Lava Cakes
Gathering the right ingredients is the first step to creating these delightful Chocolate Lava Cakes. Here’s what you’ll need:
- Unsalted Butter: This adds richness and moisture to the cakes. Using unsalted allows you to control the saltiness.
- Semi-Sweet Chocolate Chips: The star of the show! They provide that luscious, gooey center. You can also use dark chocolate for a more intense flavor.
- Large Eggs: Essential for structure and richness. They help the cakes rise beautifully.
- Granulated Sugar: This sweetens the batter and contributes to the cake’s texture.
- All-Purpose Flour: Just a touch is needed to give the cakes a bit of structure while keeping them soft.
- Salt: A pinch enhances the chocolate flavor, making it even more delicious.
For those looking to mix things up, consider adding a splash of vanilla extract for extra flavor or a sprinkle of espresso powder to deepen the chocolate taste. If you’re feeling adventurous, you can even try using gluten-free flour as a substitute. Remember, the exact quantities for these ingredients are listed at the bottom of the article for your convenience!
How to Make Chocolate Lava Cakes
Now that we have our ingredients ready, let’s dive into the fun part—making these Chocolate Lava Cakes! Follow these simple steps, and you’ll be on your way to dessert heaven.
Step 1: Preheat the Oven
First things first, preheat your oven to 425°F (220°C). Preheating is crucial because it ensures that your cakes bake evenly. If the oven isn’t hot enough, the centers won’t get that gooey texture we all love. So, let that oven warm up while you prepare the rest!
Step 2: Prepare the Ramekins
Next, grab four ramekins and grease them with butter. Make sure to coat the sides well, then dust them lightly with flour. This step is key for easy removal later. You want your cakes to slide out effortlessly, revealing that beautiful molten center. Trust me, no one wants a cake stuck in a ramekin!
Step 3: Melt the Butter and Chocolate
Now, let’s melt the butter and chocolate together. You can do this in the microwave or a double boiler. If using the microwave, heat in short bursts of 20 seconds, stirring in between. This prevents burning. The goal is a smooth, glossy mixture that smells heavenly. It’s like a warm hug for your taste buds!
Step 4: Whisk the Eggs and Sugar
In a separate bowl, whisk together the eggs, egg yolks, and granulated sugar. You want to whisk until the mixture is pale and thick, almost like a fluffy cloud. This step is essential for creating a light texture in your cakes. It helps them rise beautifully, giving you that perfect lava effect!
Step 5: Combine Mixtures
Now, gently fold the melted chocolate mixture into the egg mixture. Use a spatula and be careful not to deflate the eggs. You want to keep that airy texture. This is where the magic happens, as the rich chocolate blends with the eggs, creating a luscious batter.
Step 6: Add Flour and Salt
Next, sift in the flour and salt. Gently fold them into the batter until just combined. Be cautious not to overmix! Overmixing can lead to dense cakes, and we want them to be light and gooey. Just a few folds should do the trick!
Step 7: Fill the Ramekins
Now it’s time to fill those prepared ramekins. Pour the batter evenly into each one, filling them about three-quarters full. This allows room for the cakes to rise without overflowing. Plus, it ensures that each cake has that delightful molten center!
Step 8: Bake to Perfection
Pop the ramekins into your preheated oven and bake for 12-14 minutes. Keep an eye on them! The edges should be firm, but the center should still look soft. A toothpick inserted in the center should come out with a bit of gooey chocolate on it. That’s how you know they’re ready!
Step 9: Serve Immediately
Once baked, let the cakes cool for just one minute. Then, carefully invert them onto plates. Serve immediately for the best experience! I love to top mine with a scoop of vanilla ice cream or a dollop of whipped cream. The contrast of hot and cold is simply divine!
Tips for Success
- Use high-quality chocolate for the best flavor.
- Don’t skip the greasing and dusting of ramekins; it’s crucial for easy removal.
- Keep an eye on the baking time; every oven is different.
- For a fun twist, add a piece of chocolate or a berry in the center before baking.
- Serve immediately for that perfect lava effect!
Equipment Needed
- Ramekins: Four 6-ounce ramekins are ideal. If you don’t have them, use muffin tins as an alternative.
- Mixing Bowls: A medium bowl for the egg mixture and a larger one for melting chocolate.
- Whisk: A hand whisk works well, but an electric mixer can save time.
- Spatula: A silicone spatula is perfect for folding ingredients gently.
- Oven Mitts: Essential for safely handling hot ramekins!
Variations of Chocolate Lava Cakes
- Nutty Delight: Add chopped nuts like hazelnuts or almonds to the batter for a crunchy texture.
- Fruit Fusion: Incorporate fresh raspberries or strawberries into the batter for a fruity twist.
- Spicy Kick: Mix in a pinch of cayenne pepper or chili powder for a surprising heat that complements the chocolate.
- Gluten-Free Option: Substitute all-purpose flour with almond flour or a gluten-free blend for a gluten-free treat.
- Vegan Version: Replace eggs with flaxseed meal and use dairy-free chocolate for a plant-based delight.
Serving Suggestions for Chocolate Lava Cakes
- Ice Cream: A scoop of vanilla or mint chocolate chip ice cream pairs perfectly with the warm cake.
- Fresh Berries: Serve with strawberries or raspberries for a refreshing contrast.
- Whipped Cream: A dollop of whipped cream adds a light, fluffy touch.
- Chocolate Sauce: Drizzle some chocolate sauce on top for extra indulgence.
- Presentation: Dust with powdered sugar or cocoa powder for a beautiful finish.
FAQs about Chocolate Lava Cakes
Can I make Chocolate Lava Cakes ahead of time?
Absolutely! You can prepare the batter in advance and refrigerate it. Just remember to bake them fresh when you’re ready to serve. This way, you can enjoy that gooey center without the last-minute rush!
What if my Chocolate Lava Cakes don’t have a gooey center?
If your cakes turn out too firm, it’s likely they were overbaked. Keep an eye on them during the last few minutes of baking. The edges should be set, but the center should still jiggle slightly when you take them out.
Can I use different types of chocolate?
Yes! While semi-sweet chocolate is a classic choice, feel free to experiment with dark chocolate for a richer flavor or even milk chocolate for a sweeter treat. Just adjust the sugar accordingly if you use a sweeter chocolate.
How do I store leftover Chocolate Lava Cakes?
If you have any leftovers (which is rare!), store them in an airtight container in the fridge for up to two days. Reheat them in the microwave for a few seconds before serving to revive that molten center.
Can I make these cakes in a different size?
Definitely! You can use larger ramekins or even muffin tins. Just adjust the baking time accordingly. Larger cakes will need a bit more time, while smaller ones will bake faster. Keep an eye on them!
Final Thoughts
Making Chocolate Lava Cakes is more than just baking; it’s about creating a moment of joy. The thrill of cutting into that warm cake and watching the chocolate flow is pure magic. Whether you’re sharing them with family or enjoying a quiet evening alone, these cakes bring a sense of indulgence that’s hard to resist. Plus, they’re quick and easy, making them perfect for busy days. So, gather your ingredients, embrace the process, and let the sweet aroma fill your kitchen. Trust me, every bite will remind you why life is sweeter with a little chocolate!
Print
Chocolate Lava Cakes: Indulge Your Sweet Tooth Today!
- Prep Time: 15 minutes
- Cook Time: 14 minutes
- Total Time: 29 minutes
- Yield: 4 servings 1x
- Category: Dessert
- Method: Baking
- Cuisine: American
- Diet: Vegetarian
Description
Chocolate Lava Cakes are rich, decadent desserts with a gooey chocolate center that flows out when you cut into them, perfect for satisfying your sweet cravings.
Ingredients
- 1/2 cup unsalted butter
- 1 cup semi-sweet chocolate chips
- 2 large eggs
- 2 large egg yolks
- 1/4 cup granulated sugar
- 2 tablespoons all-purpose flour
- 1/4 teaspoon salt
Instructions
- Preheat your oven to 425°F (220°C).
- Grease four ramekins with butter and dust with flour.
- Melt the butter and chocolate chips together in a microwave or double boiler until smooth.
- In a separate bowl, whisk together the eggs, egg yolks, and sugar until pale and thick.
- Fold the melted chocolate mixture into the egg mixture.
- Gently fold in the flour and salt until just combined.
- Pour the batter evenly into the prepared ramekins.
- Bake for 12-14 minutes until the edges are firm but the center is soft.
- Let cool for 1 minute, then invert onto plates and serve immediately.
Notes
- Serve with vanilla ice cream or whipped cream for extra indulgence.
- Make sure not to overbake to keep the center gooey.
- Can be prepared ahead of time and refrigerated before baking.
Nutrition
- Serving Size: 1 cake
- Calories: 350
- Sugar: 25g
- Sodium: 150mg
- Fat: 20g
- Saturated Fat: 12g
- Unsaturated Fat: 8g
- Trans Fat: 0g
- Carbohydrates: 35g
- Fiber: 2g
- Protein: 5g
- Cholesterol: 100mg