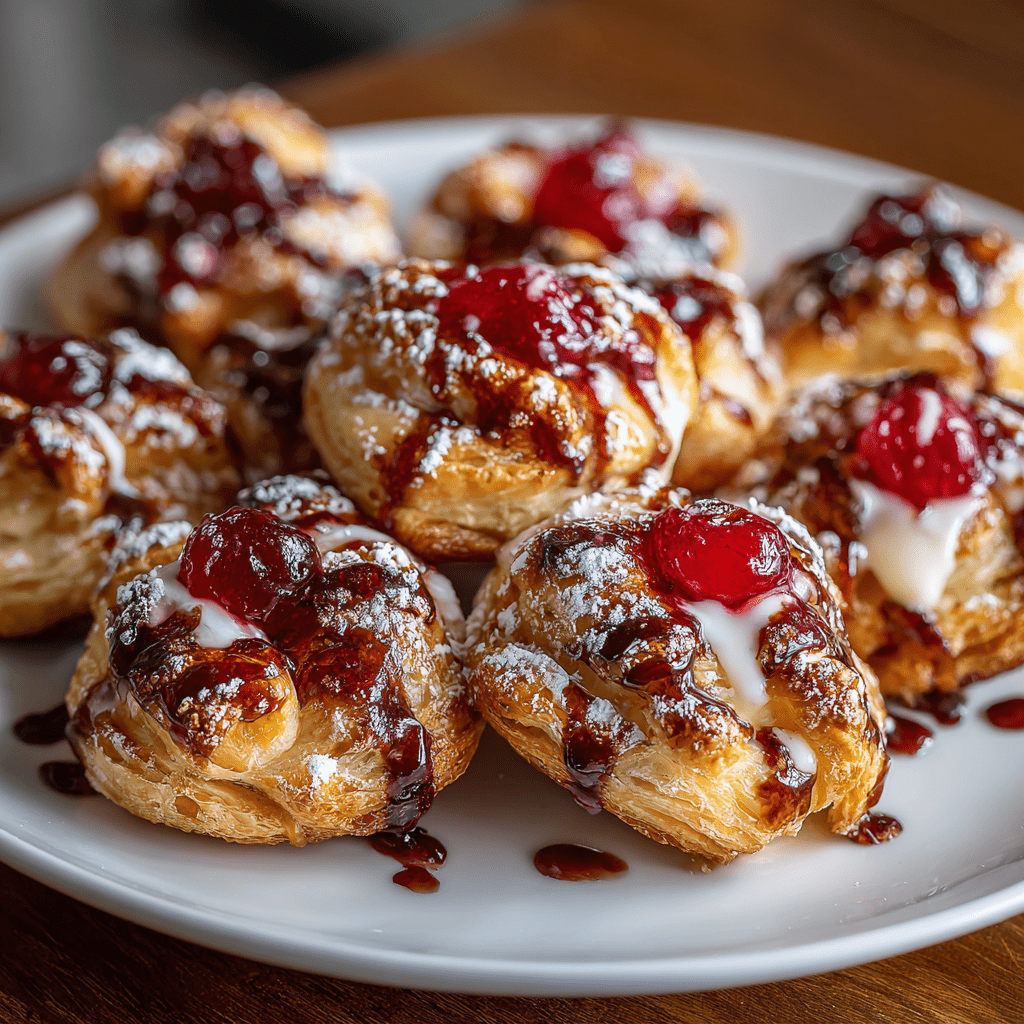
Introduction to Mini Cherry Cheese Danishes
As a busy mom, I know how precious time can be, especially in the mornings. That’s why I absolutely adore these Mini Cherry Cheese Danishes! They’re not just a treat; they’re a quick solution for a busy day. Imagine waking up to the aroma of freshly baked pastries, filled with creamy cheese and sweet cherry goodness. It’s like a warm hug for your taste buds! Whether you’re looking to impress your loved ones or simply want a delightful breakfast, these danishes are sure to bring smiles all around. Let’s dive into this delicious adventure together!
Why You’ll Love This Mini Cherry Cheese Danishes
These Mini Cherry Cheese Danishes are a game-changer for busy mornings or last-minute gatherings. They come together in no time, making them perfect for those hectic days when you need a quick yet impressive treat. The flaky pastry, creamy filling, and sweet cherry topping create a delightful flavor explosion. Plus, they’re versatile enough to please even the pickiest eaters in your family. Trust me, once you try them, you’ll be hooked!
Ingredients for Mini Cherry Cheese Danishes
Gathering the right ingredients is the first step to creating these delightful Mini Cherry Cheese Danishes. Here’s what you’ll need:
- Puff pastry sheets: The star of the show! These flaky layers provide the perfect base for your danishes. You can find them in the freezer section of your grocery store.
- Cream cheese: This creamy goodness is what makes the filling rich and smooth. Make sure it’s softened for easy mixing.
- Granulated sugar: A touch of sweetness to balance the tanginess of the cream cheese. You can also use powdered sugar for a smoother texture.
- Vanilla extract: Just a splash adds a warm, inviting flavor to the filling. It’s like a secret ingredient that elevates the taste!
- Cherry pie filling: This is where the magic happens! The sweet, juicy cherries on top make these danishes irresistible. Feel free to swap it out for your favorite fruit filling, like blueberry or raspberry.
- Egg (for egg wash): This helps achieve that beautiful golden color on the pastry. You can use milk or cream as a substitute if you prefer.
For exact measurements, check the bottom of the article where you can find everything listed for easy printing. Now that you have your ingredients ready, let’s get cooking!
How to Make Mini Cherry Cheese Danishes
Now that we have our ingredients ready, let’s get into the fun part—making these Mini Cherry Cheese Danishes! Follow these simple steps, and you’ll have a batch of delightful pastries in no time.
Step 1: Preheat the Oven
First things first, preheat your oven to 375°F (190°C). Preheating is crucial because it ensures that your danishes bake evenly. A hot oven helps the puff pastry rise beautifully, creating that flaky texture we all love.
Step 2: Prepare the Puff Pastry
Next, take your puff pastry sheets out of the freezer and let them thaw for a few minutes. Once they’re pliable, roll them out on a lightly floured surface. Cut the pastry into squares, about 4 inches each. Don’t worry about being perfect; a little rustic charm adds character!
Step 3: Make the Cream Cheese Filling
In a mixing bowl, combine the softened cream cheese, granulated sugar, and vanilla extract. Use a hand mixer or a whisk to blend everything until it’s smooth and creamy. This filling is the heart of your danishes, so make sure it’s well mixed and free of lumps!
Step 4: Assemble the Danishes
Now comes the fun part! Place a generous spoonful of the cream cheese mixture in the center of each pastry square. Then, add a spoonful of cherry pie filling right on top. The combination of flavors is simply divine!
Step 5: Fold and Seal
To create a pocket for your filling, fold the corners of the pastry squares over the filling. Pinch the edges together to seal them well. This step is essential to keep all that deliciousness inside while baking!
Step 6: Apply Egg Wash
Brush the tops of your danishes with the beaten egg. This egg wash gives them a beautiful golden finish when baked. If you’re looking for a lighter option, you can use milk or cream instead.
Step 7: Bake to Perfection
Place your assembled danishes on a baking sheet lined with parchment paper. Bake them in the preheated oven for 20-25 minutes, or until they’re golden brown. Keep an eye on them; every oven is a little different, and you want them just right!
Step 8: Cool and Serve
Once they’re out of the oven, let your Mini Cherry Cheese Danishes cool for a few minutes. This waiting time is crucial; it allows the filling to set a bit. Trust me, they’re worth the wait! Serve them warm, and watch your family’s faces light up with joy.
Tips for Success
- Make sure your cream cheese is softened for easy mixing.
- Don’t skip the egg wash; it’s key for that golden color!
- Keep an eye on the baking time; ovens can vary.
- For extra flavor, consider adding lemon zest to the cream cheese filling.
- These danishes freeze well; just bake them straight from the freezer!
Equipment Needed
- Baking sheet: A standard baking sheet works perfectly. If you don’t have one, a large oven-safe dish will do.
- Parchment paper: This helps prevent sticking. If you’re out, lightly greasing the baking sheet is a good alternative.
- Mixing bowl: Any bowl will work, but a medium-sized one is ideal for mixing the filling.
- Whisk or hand mixer: Use either for blending the cream cheese mixture smoothly.
- Rolling pin: If you don’t have one, a wine bottle can serve as a great substitute!
Variations of Mini Cherry Cheese Danishes
- Berry Bliss: Swap out the cherry pie filling for mixed berry filling. Blueberries, raspberries, and strawberries create a colorful and delicious twist!
- Chocolate Delight: Add a few chocolate chips to the cream cheese filling for a rich, decadent flavor. Who can resist chocolate?
- Nutty Addition: Mix in some chopped nuts, like pecans or almonds, into the cream cheese filling for added crunch and flavor.
- Gluten-Free Option: Use gluten-free puff pastry to make these danishes suitable for those with gluten sensitivities.
- Vegan Version: Substitute cream cheese with a vegan alternative and use a plant-based egg wash made from almond milk and a bit of cornstarch.
Serving Suggestions for Mini Cherry Cheese Danishes
- Pair these danishes with a hot cup of coffee or tea for a delightful breakfast experience.
- Serve them alongside fresh fruit, like strawberries or blueberries, for a colorful plate.
- For a special touch, dust with powdered sugar before serving to add a sweet finish.
- Consider a dollop of whipped cream on the side for an indulgent dessert option.
- Arrange them on a beautiful platter for an eye-catching presentation at gatherings.
FAQs about Mini Cherry Cheese Danishes
Can I make Mini Cherry Cheese Danishes ahead of time?
Absolutely! You can prepare the danishes and freeze them before baking. Just pop them in the oven straight from the freezer when you’re ready to enjoy them. It’s a fantastic time-saver for busy mornings!
What can I use instead of cherry pie filling?
If cherries aren’t your thing, feel free to swap in other fruit fillings! Blueberry, raspberry, or even peach pie filling can work beautifully. The possibilities are endless!
How do I store leftover danishes?
Store any leftovers in an airtight container in the fridge for up to three days. You can reheat them in the oven for a few minutes to regain that fresh-baked taste.
Can I use homemade pastry instead of store-bought?
Of course! If you’re feeling adventurous, homemade pastry can elevate your danishes. Just ensure it’s rolled out thinly for that perfect flaky texture.
Are Mini Cherry Cheese Danishes suitable for a vegetarian diet?
Yes! These danishes are vegetarian-friendly. Just be sure to check the ingredients in your puff pastry to ensure it meets your dietary needs.
Final Thoughts
Making Mini Cherry Cheese Danishes is more than just baking; it’s about creating moments of joy in your kitchen. The delightful aroma wafting through your home, the smiles on your family’s faces, and the satisfaction of serving something homemade are truly priceless. These danishes are perfect for any occasion, whether it’s a cozy breakfast or a sweet treat after dinner. Plus, they’re so easy to whip up, even on the busiest days! I hope you enjoy this recipe as much as I do, and may your kitchen be filled with love and laughter every time you bake!
Print
Mini Cherry Cheese Danishes Deliver Irresistible Flavor!
- Prep Time: 15 minutes
- Cook Time: 25 minutes
- Total Time: 40 minutes
- Yield: 12 servings 1x
- Category: Dessert
- Method: Baking
- Cuisine: American
- Diet: Vegetarian
Description
Mini Cherry Cheese Danishes are delightful pastries filled with a creamy cheese mixture and topped with sweet cherry filling, perfect for breakfast or dessert.
Ingredients
- 1 package of puff pastry sheets
- 8 oz cream cheese, softened
- 1/4 cup granulated sugar
- 1 tsp vanilla extract
- 1 can cherry pie filling
- 1 egg, beaten (for egg wash)
Instructions
- Preheat the oven to 375°F (190°C).
- Roll out the puff pastry sheets and cut them into squares.
- In a bowl, mix the softened cream cheese, sugar, and vanilla extract until smooth.
- Place a spoonful of the cream cheese mixture in the center of each pastry square.
- Top the cream cheese with a spoonful of cherry pie filling.
- Fold the corners of the pastry over the filling to create a pocket.
- Brush the tops with the beaten egg.
- Bake for 20-25 minutes or until golden brown.
- Let cool before serving.
Notes
- For a golden finish, ensure to brush the pastry with egg wash.
- These can be made ahead of time and frozen before baking.
- Feel free to substitute cherry filling with other fruit fillings.
Nutrition
- Serving Size: 1 danish
- Calories: 200
- Sugar: 10g
- Sodium: 150mg
- Fat: 12g
- Saturated Fat: 7g
- Unsaturated Fat: 3g
- Trans Fat: 0g
- Carbohydrates: 20g
- Fiber: 1g
- Protein: 3g
- Cholesterol: 30mg